
CUTTING PLOTTER > SUPPORT > FAQ, VIDEO, AND HOW-TO > PRINT & CUT ISSUES > ADJUSTING THE SENSOR LEVEL
ADJUSTING THE SENSOR LEVEL
This procedure is to automatically adjust the sensor to read marks on medias that are reflective, media with background color, or hight intensity reflective medias. After the job is complete, please return to Default.


OPERATION
1) Load the media that has the printed registration marks. The adjustment will be executed at the search area for the 1st mark.
The type of mark to be used needs to be set on the menu of the mark type on the ARMS setting menu (screen 2 of 4) before adjustment is executed.
2) Press the [MENU] key. MENU Screen is displayed.
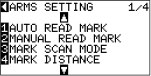
3) Press the [2] key (ARMS). ARMS SETTING screen (1/4) is displayed.
4) Press the POSITION key twice. ARMS SETTING screen (3/4) is displayed.
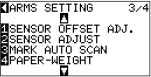

5) Press the [2] key (SENSOR ADJUST). SENSOR ADJUST screen is displayed.
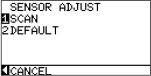
The [2] DEFAULT can not be selected until the adjustment has been performed. When the adjustment has been performed, the following screen is displayed.
It will return to ARMS setting screen (3/4) after setting the sensor level to default when you press the [2] key (DEFAULT).
6) Press the [1] key (SCAN). Following message is displayed.

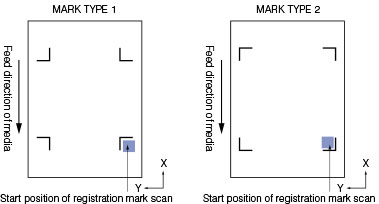
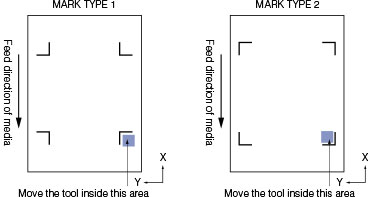
7) Press the POSITION key and move the tool carriage to the area to start scanning of the registration mark. The start position for the tool carriage is shown below. Be sure to have Rotate and Mirror disabled and load the media from the rear for this test. Start position of registration mark scan:

The tool carriage will move faster when the [FAST] key is pressed simultaneously with the POSITION key.
8) Confirm the position of the tool, and if it is OK, press the [ENTER} key. Registration mark is scanned, and sensor level is adjusted. It will return to ARMS setting screen (3/4) once the adjustment is completed.
9) Press the [MENU] key. It will return to default screen.
It will return to SENSOR ADJUST screen without adjustment when you press the [4] key (CANCEL).
It may not scan correctly even after the adjustment depending on the condition of the media. See "Manual Position Adjust" if the detection does not completely properly.
CUTTING PLOTTER > SUPPORT > FAQ, VIDEO, AND HOW-TO > PRINT & CUT ISSUES > ADJUSTING THE SENSOR LEVEL